Hi everyone, I will be talking about the class of May 18, 2010. So, today we started using the microscopes to see cells and we started the cell lab.
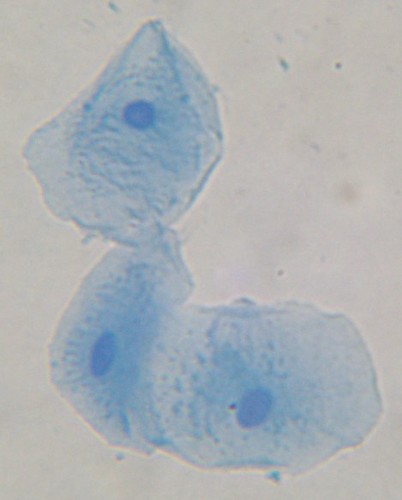
This cell lab had a very specific way to see the cells. You had to first rub the inside of your mouth with a toothpick. Then you pour a couple drops of Methyl blue onto a glass slide. Then you placed the cells in the Methyl blue and stirred it with the toothpick. You placed the cover slip (a plastic slip) at an acute angle to the glass slide and you dropped it. If you did this correctly, then the Methyl blue would spread across the cover slip and leave no air bubbles. We drew pictures of our cheek cells with magnifications of 40 & 100, although some people had a microscope with more lenses, who could see at a whopping magnification of 400 times. We could see the nucleus, cytoplasm, mitochondria, and cell membrane of the cell. Some of us managed to get onto the second step, which involved seeing onion cells, but I personally didn't see what they were like.
We also spent some time talking about the field trip to "Bodies Revealed". As you probably all know, "Bodies Revealed" is an exhibit full of the bodies of people who donated themselves to the cause. You can see all sorts of human parts, such as the lungs of a smoker, the brain, and even things such a baby in a bottle. Don't worry, all of the babies died of complications. None came from abortions. That's pretty much it. Thanks!
The next scribe is Noam for the trip, Bryce for the class.


Hello Alix,
ReplyDeleteYour description of the lab although brief is informational and the picture is very similar to what we saw through the microscope. There are areas however where you could improve. It is a bit confusing having the "hi" close to the top of your image and then having everything else start at the bottom. Scientifically speaking you should add an x after the magnification number. Complements for being to fit in so much information in what seems like so little.
Alix - nice opening picture of the cheek cells. It would have been helpful to have labelled them and their parts or at least had a caption with the picture to explain it. The blue you have chosen is easy to read, but you could have had more variety in color choice. Nice clarification in how to do the cheek cell lab and make the slide itself, but some of your information is incorrect. Be sure to read through what you have written before posting it. I think some links or some more pictures would have increased the overall feel of the post. Plus, you did not include a link to real-life with what we were doing. Keep in mind that was the new requirement for blogging during fourth quarter. Not bad - but could use some more effort. ~Ms. D.
ReplyDeleteGood job Alix. I like your post and the picture about the cell. But you have to put a different title and don't start with hi. Your information is great but I think that you have to put maybe a link. The colour is also great but is a bit hard to read. I like that you put the experiment that you did in class. But you did a great job
ReplyDeleteDavide (minor post)
Yo Alix! I liked your blog comment becuase it was simple and to-the-point. I aslo liked the picture that you put becuase it is a good representation of a cell. I also liked that you included a different color for the words instead of just black. The thing that you could improve next time is that the dates of the post are wrong. The post is called May 18,2010 but the title is may 20,2010. It would be good if you fixed that. All in all, you did a good job Alix!
ReplyDelete